The devil entered the stage!


This is a write-up for solving the devils-swapper RE challenge. It was mostly intended for my personal archive, but since it may be interesting to all of you. This especially applies if you're still rather new to the whole RE world, as the write-up turned out to be quite verbose. I hope it is still formatted in a clear and concise way to be able to follow along my thought process easily. If there are any open questions left, feel free to ask :)!
The binary
Copied from the challenge linked above and pasted below for people who want to follow what I did:
Building:
cat textfile | base64 -d | gunzip > challenge && chmod +x challengeChallenge:
H4sIACYAPFkAA+1YXWwUVRS+s7uzHbZldkXUGpAMcUlawKXDj1ClsFO37V3YaoGWHwHLtt2WBvrj
7kwtBKU4tnJZVonER3mRFzQhfTCIldCBQgs8qCWINUQQI2TLEPn/EbTjubuztd2ExAcfe5Iz555z
z3fOd2fuzM7O9qJAsYVhUEosaBGiXgfjTfheM77TNZwCsQXIBkcHGpfIZdFI8Y6ybRlolEVISBwp
zk4HqbquDaNslhlePVw3ibOZKpiUBZNnyrrN7JS1mXbZFblmmMJ/kBQtip8IagUteb0CfcDt/T17
R0d986+XP//2Xt28PUNtBatErWs6zB89zXpRNyUWV+Cwo+AwoKTyLovCvSVqgwfBW9NFCx+9m0qE
8BIwlZhcXYVj5UMcJs9s4QUUj0AUk744TbrbufAr5Pxa85MzThYXbDMMo8X5YKAs/ixMriEcVk8Z
PZ1o8CeY6GQGfwBzOBvOYw+OsgIUw2QIk0W4r4SjKwKbWFxfSXbCJSU53RaIDLZYEKrA5Iq0yk9+
klZKFVK5n5xbgckdrF7PIe8e8auLUWlsO6fcLyVDAfIQR124/az8HFYfPa9k4qiXw+2aMk+3Y1Vz
6ZfF+902uxeWGJ8OlXFM6ZXIyS4H9IR1lQJJH7kR5xJTRb04CkzY8HgB+aMZUEaegNWHUxW7P7qK
0zm/2ufSr4pnoR3u0xDaYGBn0XHwCRsBiKj5ozxuPy27sfqnVRnnj66kVPTx4LLULQb3LBRTe136
OVp9MSX+ingak/NYPb5A3XoqQ3kRR4tdUHEcVIShAEN7cpgDw0kw1DlsHMP5x5RTgSjroFx3PKR7
z/nhQXomo+z5LIjla87394Hvj5WtxNF5XVn0ChzD6m83ce65QCzgdvrVyzcD5Ps7+wMQzz0mane+
WBpbyGBS8Bkkx4uGDKP7KTh1cVqd0s0+Ohlcuh/WJCPOTzXnIU23iBph82mDqBU4bk+0YjdSY2i7
yowPzsoZbY9mKbf0ePTdIwHyGyYX46V/G4bOHm6ilWKhgbXSOmm99JZUub5HqhA1qRz2wD2sfmfA
lX+MyY1lmNy6fRCTS5icSQ4fwHkfwA/6MfMdNs7I+Tj/NmyUd6bj3P5AbGZmIF+Xp+wqQgusyoRE
yz8AHN8L7WAl47DRo/8iajrwHXhz7XravKdz3+AkINVpHZxIjWVwPBi6/ypWLAtEp23MFFBp++9y
MW43MPlbXiRqWD1tUCb9vli94Y9OduP2C3JOgFwzu01LdFP4wraFMwqUjCWxdTMYuo1OcHq/eOFN
6G22hi2Q3y8/7Txkc/rgwMMF9uVq8jV6anvKJUsX3K2I7UVephvuVlSh4RXXd9jgdvkkbvyFDTnm
dBsi00XnsLYu5nJHIN5muDcLTvQNYmj0Evnyjq/P5X6nuHW7r2+ie6W4dZuvL9s9R54y+9U2GeGX
N8Ww7SLZ6Q3crI11MfTZOJDrszjdtGceEu1x7a9phpHvl68H2KvkvE6wruOTJxI81q9dJ/W4BfRa
OFi9qSEk1DaFhbzWvLxIqNpREg6F5PrGuohQG25qEJrrq5umOhxoaSjULMjhLTDj8XgcaFZNqGWW
Eg421jQ1oICvsmx5UeANyYdagpvrwvWNNch8BlJhti5HTKuLmZSVwe0BonMhNhn0R9izB2hCIe/a
bVnOZ3dYJV5QbSV8J2fZyQsSny3xrkKeM+tQTDnoiUeGUUgDMFvt4LmSTCmRQ/vJoPMfG4Z9xHOZ
xneDToP47BHxmaD7QRdDfIhJ1uuwvDbeXvix1f+RLcbutvvUDOs1BnjTfMr7HCjdaa0m75jFx2fv
prw7bJjPUdkSPs+yls+REvQLE/QpLgvqVwGudhhXOIyTKE4CXAWf4xuBo7x9gNsDuBf+86/QmIzJ
mIzJmIzJmIzJ/y+Jv9GGIzEuU8LNrcLbbwvNVcF6oaq6rqUqWDvV0Sgr4nviXE/eXM+cXGGuZ4EH
XoI8kY0ROSwHq5CnsUkOeeoaFU+VUr+55qX6GuSRQ60y8tQE5SDyhJuSNrSxsjYcbAghT1UkgjzV
TQ0NoUb5/1pHJij9f28x/X+/CyR9d1q+Lc2fgkZ8k0D0Xc1r2qT/s3V0PjPaTdQfiX+B9Zo26R9I
y0/HTzdjqXfaXhPfa+Irn4BP2dnmOLX+HLvXtEl/dVpDbrQ7zH94mcPfY5ImKy0//fwtNGum8K7U
dxwTj9Py0/tLZv+8tHgKPyMtnr7+UdxHyHwTv+QJ+JT8A1tGPbcIEwAA
First examination
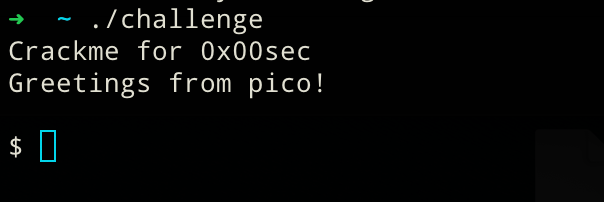
First, let's run the file to see what it's throwing at us:
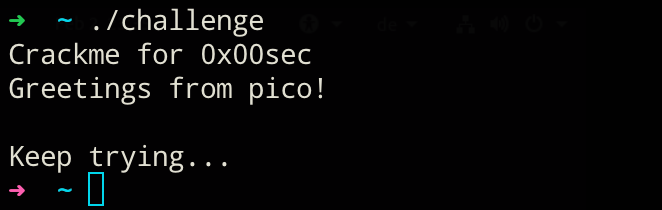
Well, what did I expect :)? Running the file will only reveal that it is somehow not working as intended... So let's check what's wrong with the binary and what it may expect as input. file has to say the following about the binary:

So, we got a stripped 64-bit ELF binary at our disposal. The challenge dictates to us that we have to find a secret key and the secret message. We do not know anything about what is meant exactly and how key and message are connected with that hint at this point. Let's continue with checking for strings within the binary:
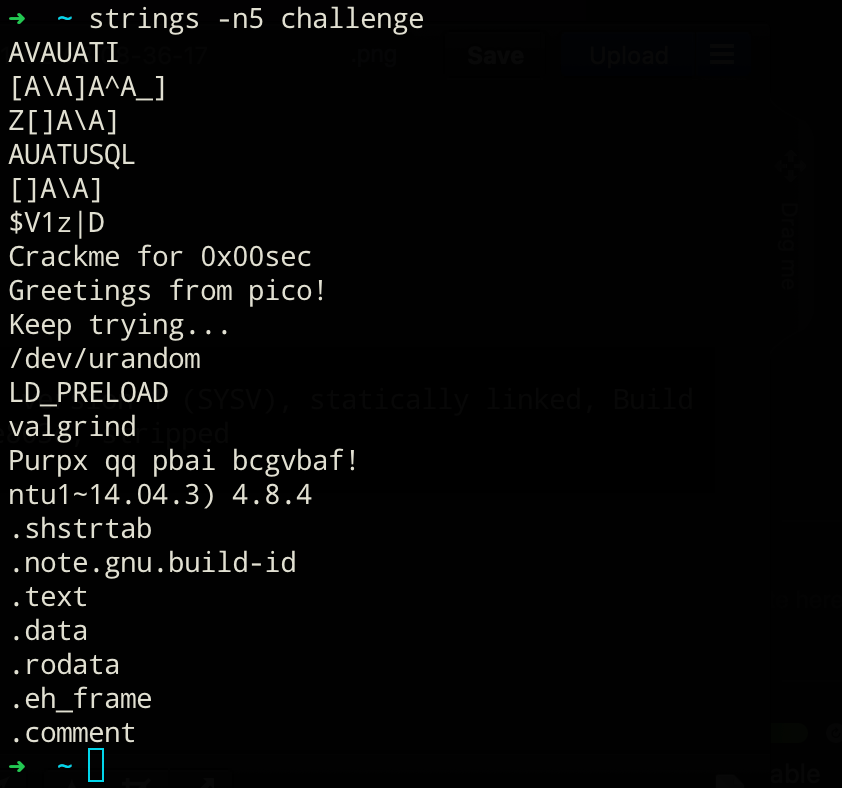
There is one particular string in there which could hide some valuable information or hints! I'm talking about this one: Purpx qq pbai bcgvbaf!
No question, some kind of cipher… Since @0x00pf said it would be a "simple" challenge, I assumed some form of Caesars ciphers. After trying for a while, I found out it was indeed a Caesars code with a key length of k=13. Exactly this kind of cipher is known under a different name as well: ROT13:

So, here is the portion of interest of the dd man page. Let's look at the possible conv flags:
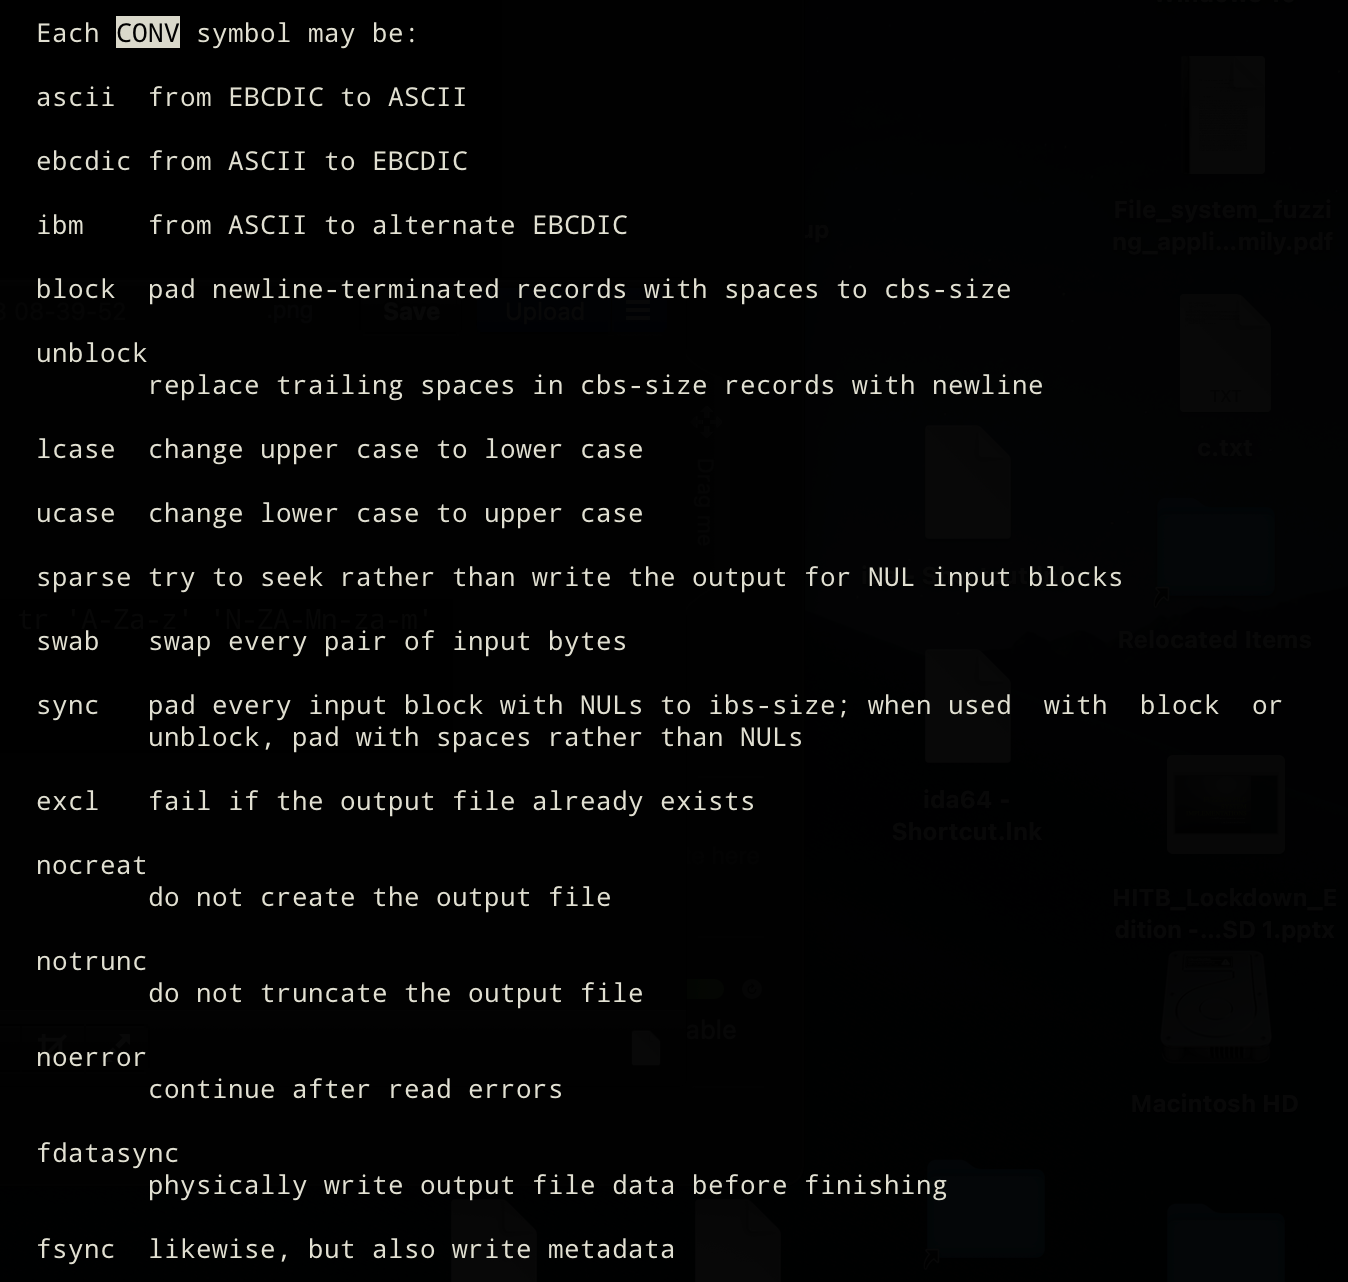
Now, one could try to associate the name of the challenge with one of the flags. But just swapping every pair of input bytes with dd if=binary of=binary2 conv=swab would not make much sense, would it?
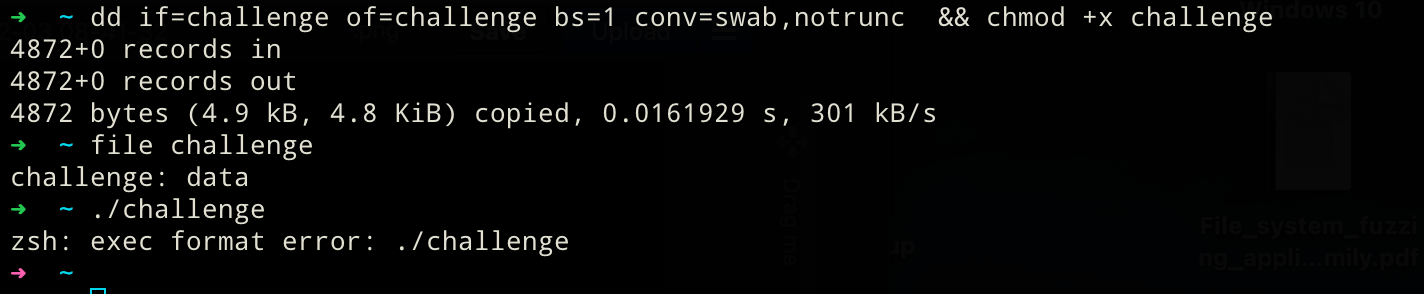
Does not seem as easy as that. But if it were, where would be the fun in that challenge! To recap: We have a valid (read it as "running") ELF64 binary right of the bat. However, applying the first hint we got does not yield any meaningful results yet.
Closer look at the binary
To see what roadblock lies in front of us I'll be using IDA to statically analyze the binary.
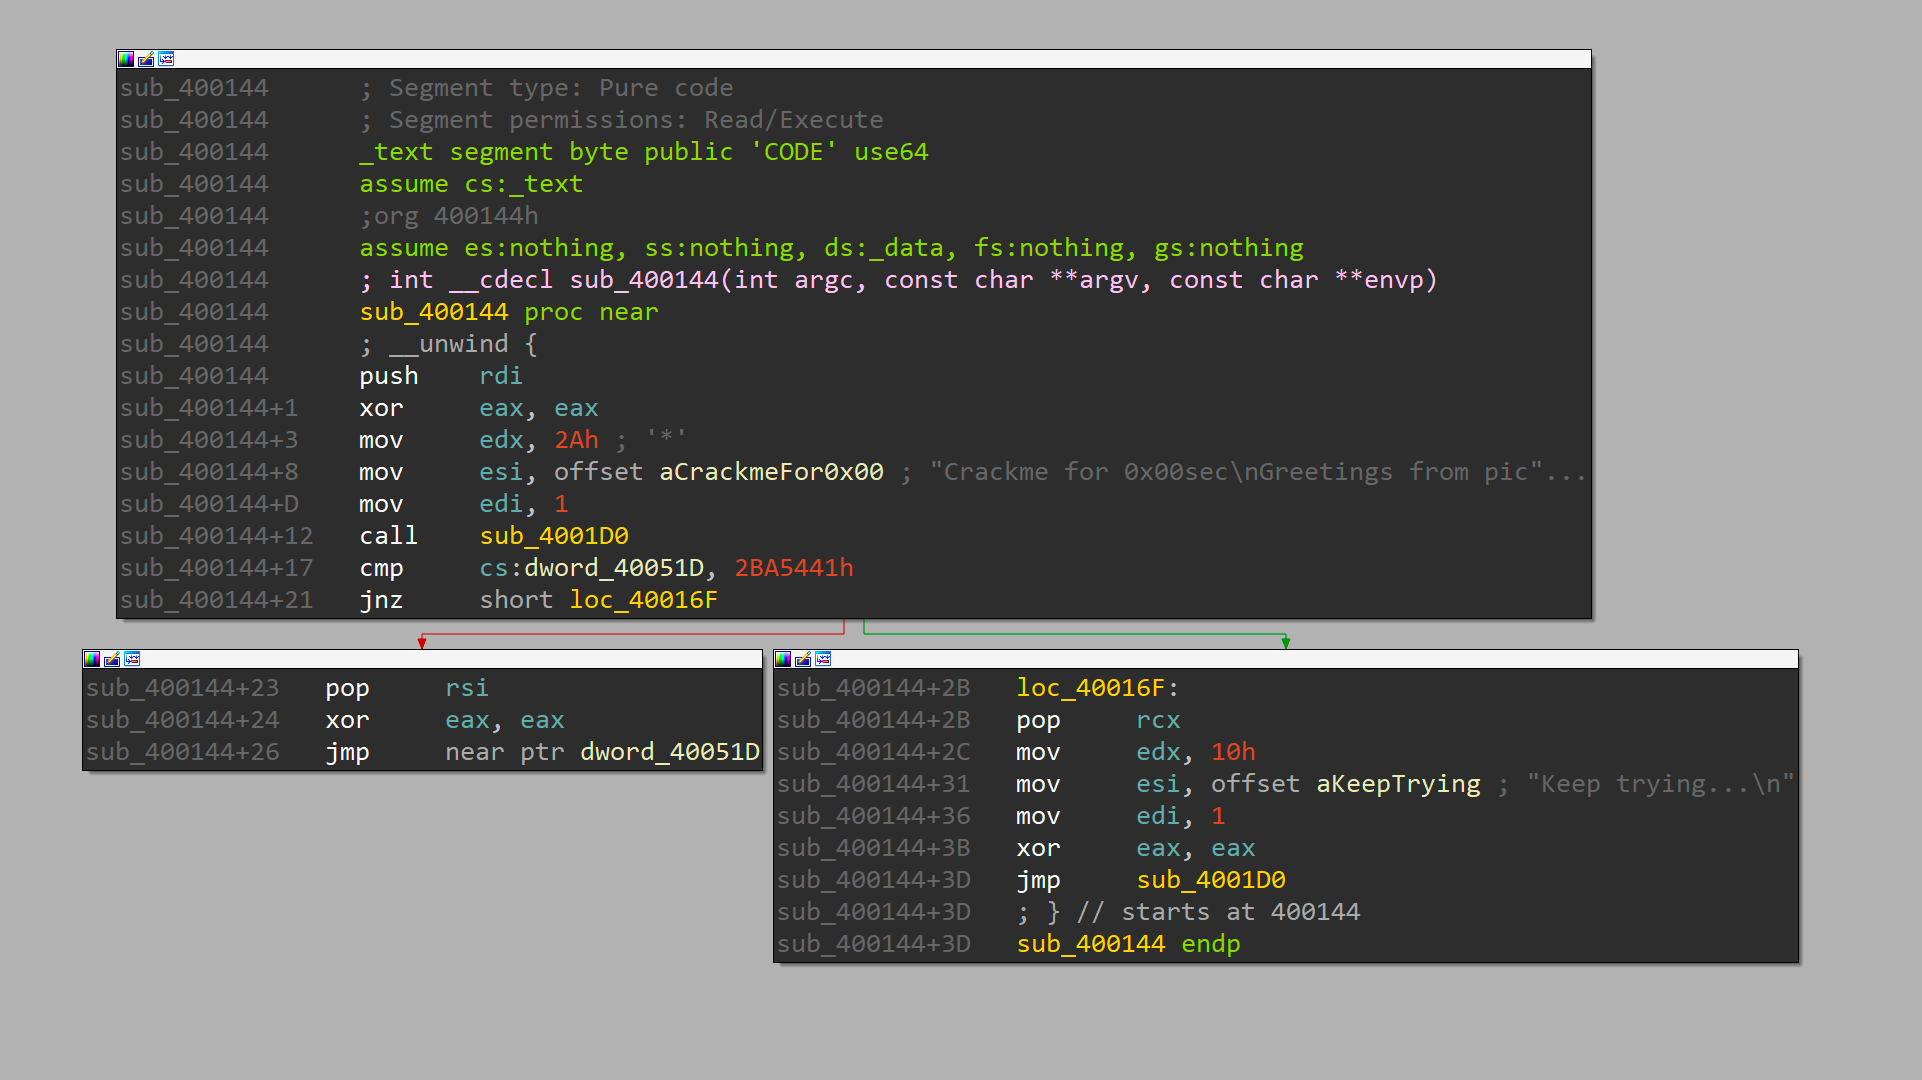
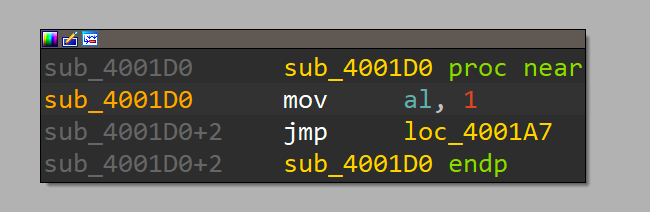
The main function is easily located as its quite short and shows the 2 known string constants we've been seeing when executing the binary. sub_4001D0 is an interesting little fellow as it’s setting the al portion in rax to 1 followed by jump in the middle of another function:
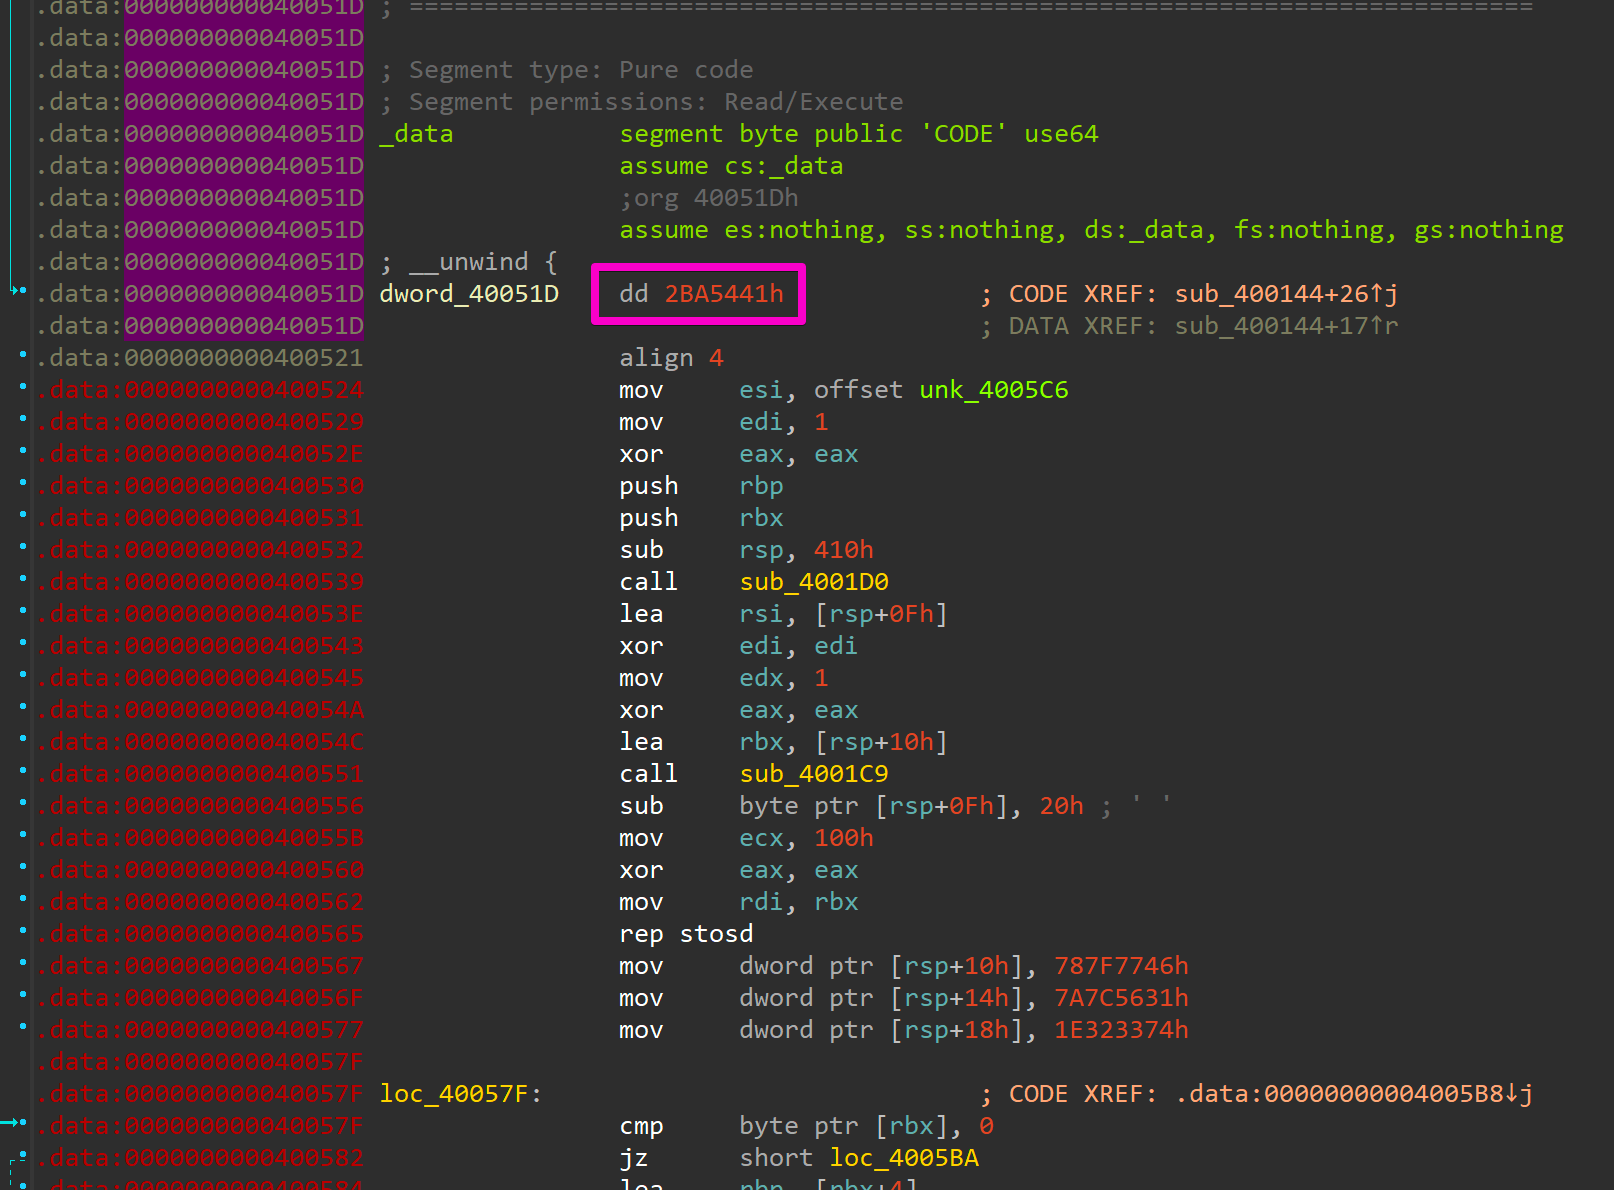
We'll take a closer at that part later. First, I want to know why the cmp followed by a jnz at main+17 is defaulting to the bad route in the original challenge. The comparison takes whatever is in the data segment (cs:XXX) and silently subtracts it from the hard-coded value of 0x2ba5441, meaning the result is not stored in one of the base registers, but the zero flag is set when both values are equal. Hence, the jump if not zero (jnz) is only not taken in the case we fix the comparison to be equal! So let's check what is being stored in that identified segment.

The data starting at address 0x40051d looks garbled and does not make much sense. However, that first dword of 0x0ba024154 looks oddly familiar, doesn't it? It's like a badly shuffled version of that hard-coded value from that comparison in main+17! At a second glance, if you swap positions of the upper two bytes and the lower two bytes you get exactly that value from the comparison! This is the time to recall the hint about looking at the conv flags of the UNIX dd utility! So let's calculate the bounds on where to partially apply that swab option:

Alternatively, we could have also extracted the size and offset from our trusty pal readelf!

When looking at the readelf output above, we see yet another weird occurrence! The .data section should hold data like variables or global tables. It should certainly not be marked as executable! So, either the flags are wrong or it actually holds binary data! Let's load the executable back into IDA and see how the disassembly changed now that we have applied the dd treatment :).
We've got a lot of new code that needs reversing! On top of that, the at first shuffled address was also corrected and matches the hard-coded address value from the main function! We should be able to pass that comparison now and not run into the bad ending again.
Running the new binary
To verify our assumption from above, let's execute our "new" binary:
Wonderful we are getting greeted by the usual but this time we get a little extra too! A brand new shell prompt that's awaiting some user input!
Finding the flag
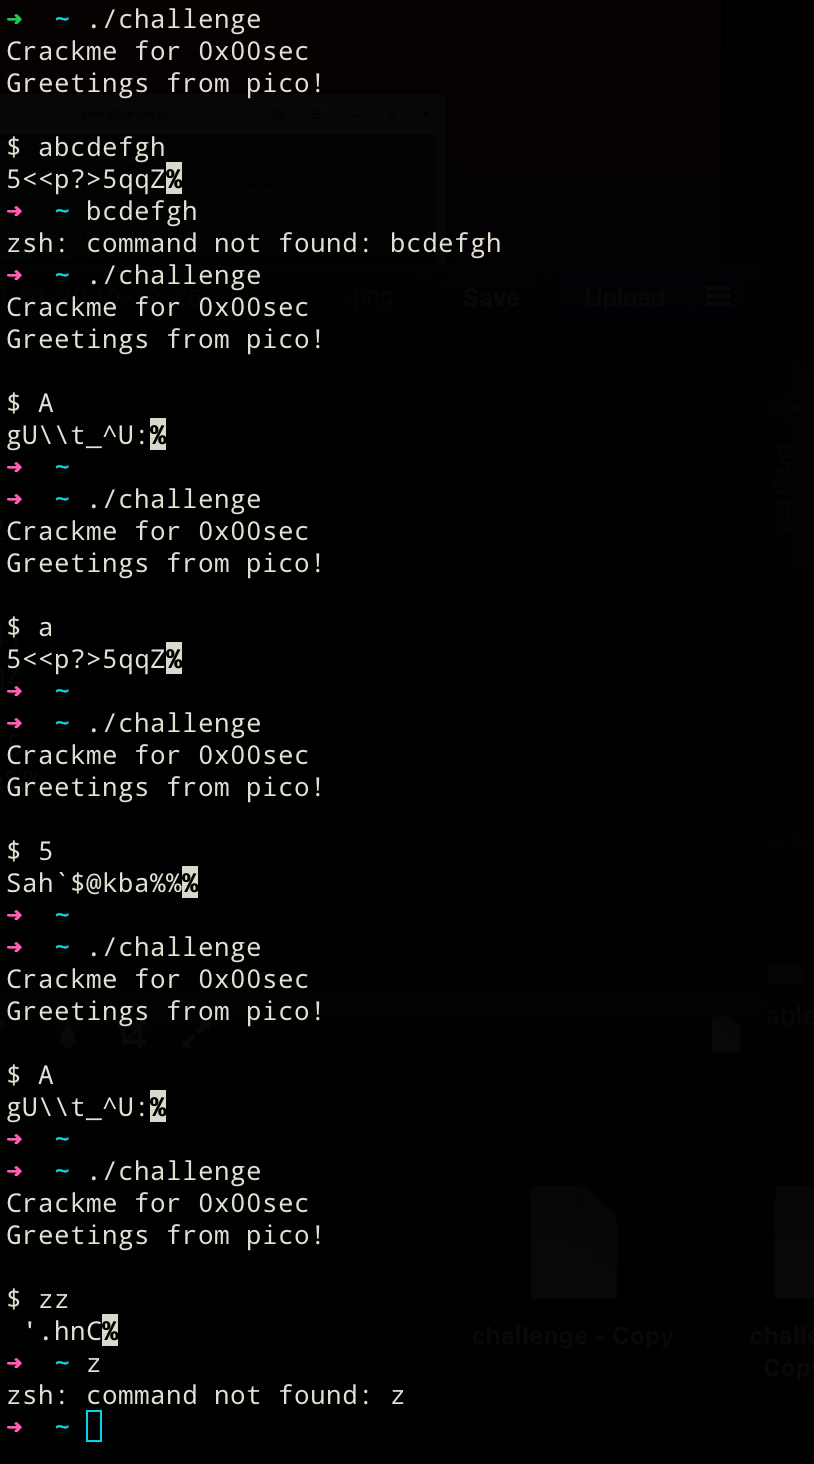
Observation
- Only the first character of the input seems to be accepted. There seems to be a different output of different lengths for each character. Also, the output behavior is deterministic, meaning the same input always yields the same output. Assumption: The different lengths of the observed outputs could be due to unprintable values that are being calculated.
- After getting a (broken?) return value, our binary terminates and our normal terminal emulator tries to execute the rest of the input as a system utility as the binary exits before handling the remaining input.
First attempt to get the secret message
So to find the flag, one could brute force their way through now. Only one character input gets seemingly validated, or at least looked at. The amount of printable user input characters is very limited to roughly 100 possibilities (s. ASCII table). We can easily brute force our way in if our assumptions still hold true... However, there is still one catch: We do not know what the behavior of the binary for the correct flag looks like yet, so let's dig deeper into that next!
Dumb brute force solution (up to here)
#!/usr/bin/env python3

from pwn import *
import string
import sys

exe = "./challenge"

def main():
    for char in string.printable:
        p = process(exe)
        p.recvuntil(b"$")
        p.sendline(char)
        # This is the line we have no knowledge about
        if ??? not in p.recvall():
            continue
        else:
            print(f"Correct input is: {char}")
            sys.exit()

if __name__ == '__main__':
main()This could be one way to brute force the solution if we would know what the expected behavior (in this case, the correct deciphered message) looks like. We obviously could just try every possibility and print out the potentially deciphered message into the terminal each time and look for what input is the correct one based on the produced output. This may be a legitimate solution if you just wanted to bypass this deciphering to get deeper into the binary. However, this part where we're currently stuck at is the whole exercise for this RE challenge. So let's continue doing that!
Part 1 of newly discovered code - Init phase
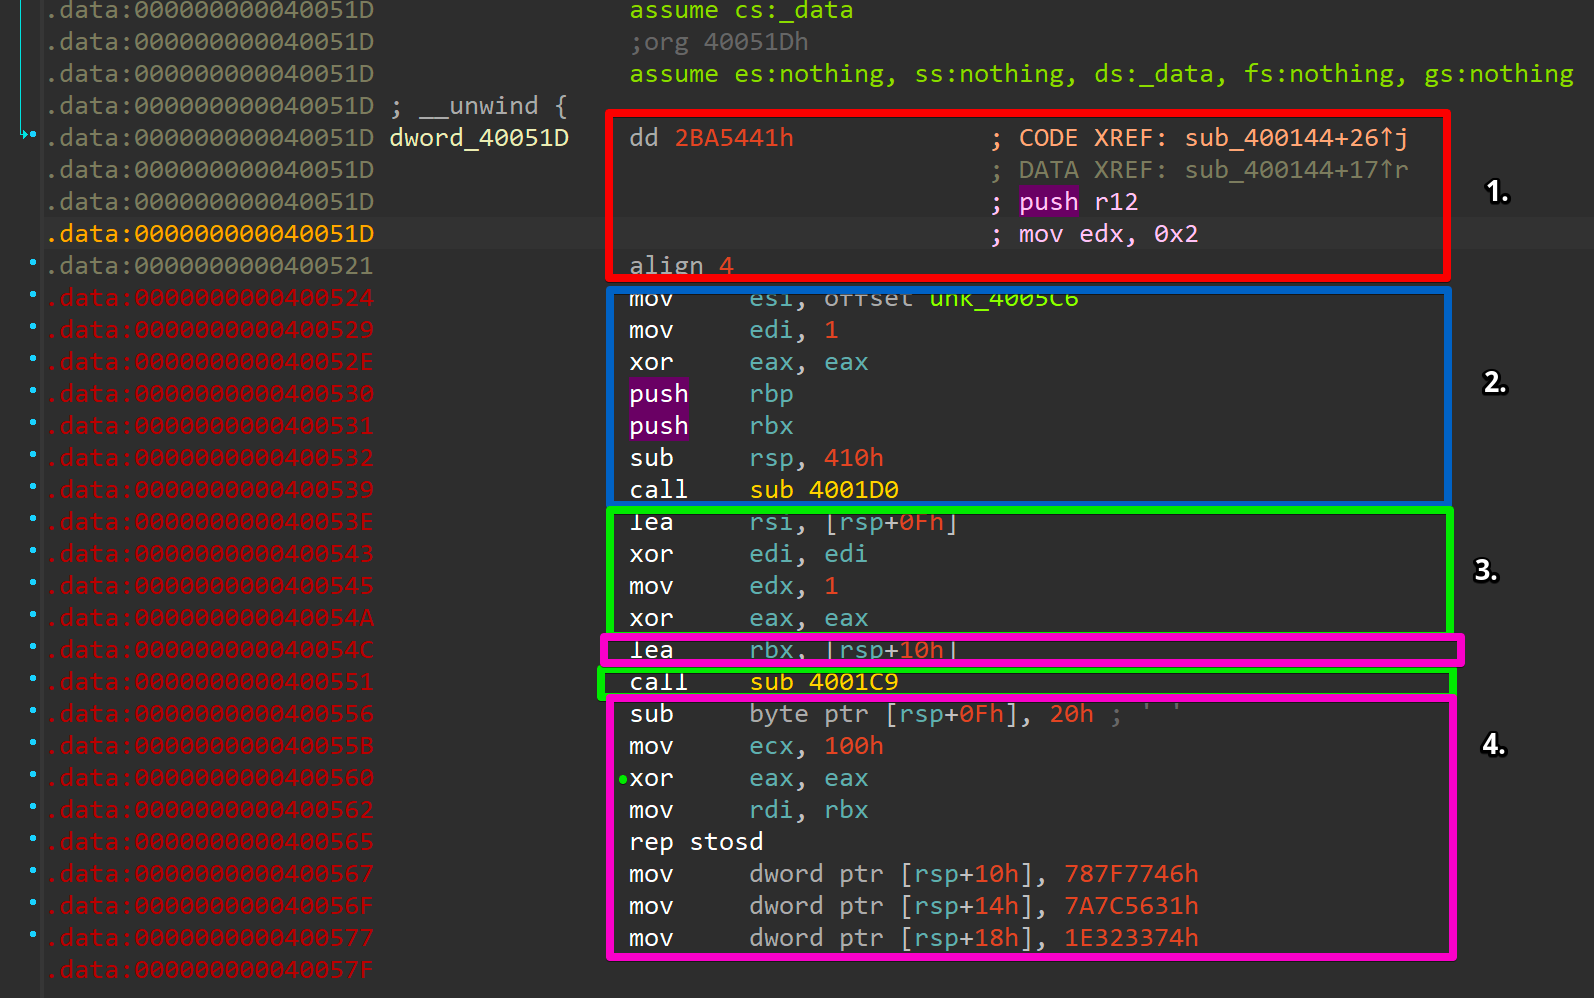
The first block is where we left of the last time. 0x2ba5441 is the destination we wanted to jump to from the main function. To fully understand what's going on next, we first need to understand that the disassembly shown here by IDA is not entirely correct. That seemingly "magic value" we jump to is not just an address, but actual code that is being executed and translates to: push r12; mov edx, 0x2.
In the second part marked as blue, we first have to understand what sub_4001d0 does before talking about the setup steps before the function call. We mentioned this particular function right at the beginning when talking about the main function too:
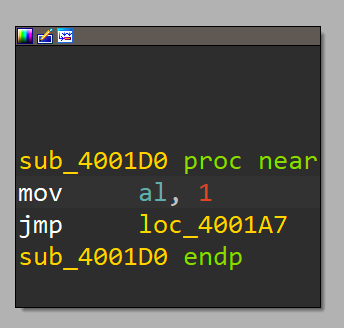
This fella is really just prepping the al portion of the raxregister before doing a direct jump into another code section:
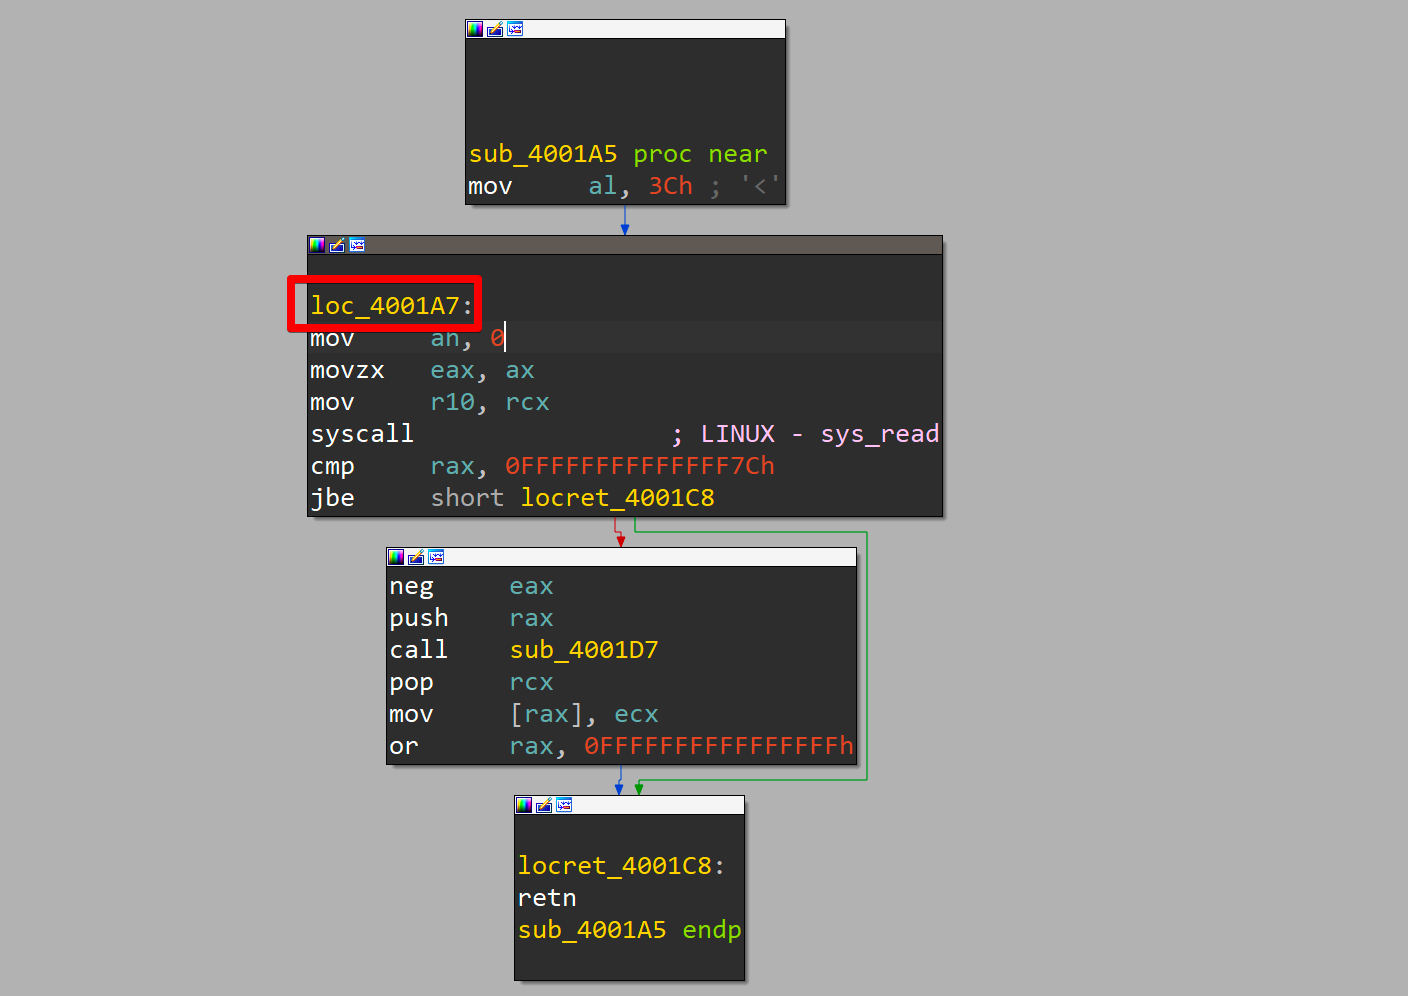
We can directly see that the jump happens in the middle of a function. We can also see that the rax register undergoes some more prepping before a syscall is issued. IDA falsely mislabels this as a sys_read syscall, which holds true when only looking at this function as an isolated code snippet. IDAs assumption is because in an ELF-64 bit binary the ABI dictates that rax holds the syscall number, which corresponds to the functionality that is being executed. In this, function rax looks like this:
0. rax - 0x????????????????
1. rax - 0x??????????????3c
2. rax - 0x????????????003c
3. rax - 0x????????0000003c
This yields 2 problems:
- There is no guarantee about what the upper 32-bit of
raxhold. - The syscall number
0x3cdoes not correspond tosys_read!
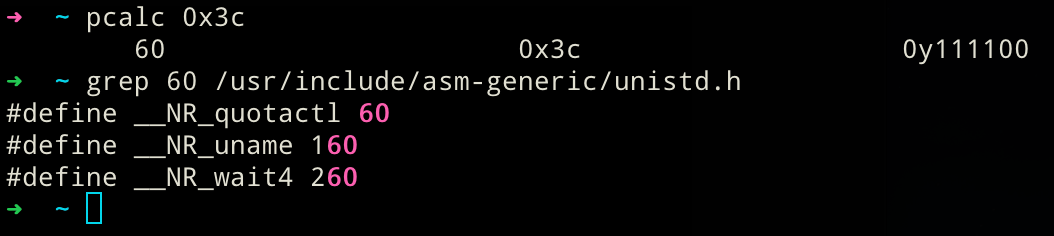
This brings up 2 new questions:
- The heck is
sys_quotactl? If you're interested, check the manpage, but it doesn't quite matter for the challenge! - Why is IDA labeling as
sys_read? Honestly, I'm not certain. It might have been the result of one of IDAs binary analysis passes.
Both questions can be easily ignored because when we back paddle a bit to the second code snippet marked with the blue box earlier, we can see there is a xor eax, eax that zeroes out the register. And that register is not modified before taking the direct jump to the helper function that sets it again to 1. Now we could question why we do not have a xor rax, rax instead, as only this instruction would zero out the upper 32-bit too. This must be because the compiler knows at compile-time that these bits were never set and hence are already 0. Using a xor eax, eax in this case saves us 1 byte:
xor eax, eax --- "\x31\xc0"
xor rax, rax --- "\x48\x31\xc0"
So that mystery is solved and caused by compiler optimizations. Now remember why we tried to figure that out in the first place! It leaves us with the following:
0. rax - 0x00000000??????01
1. rax - 0x00000000????0001
3. rax - 0x0000000000000001
Meaning that rax holds 1, which in turn results in the syscall sys_write! This clears up most of the confusion for the first snippet:

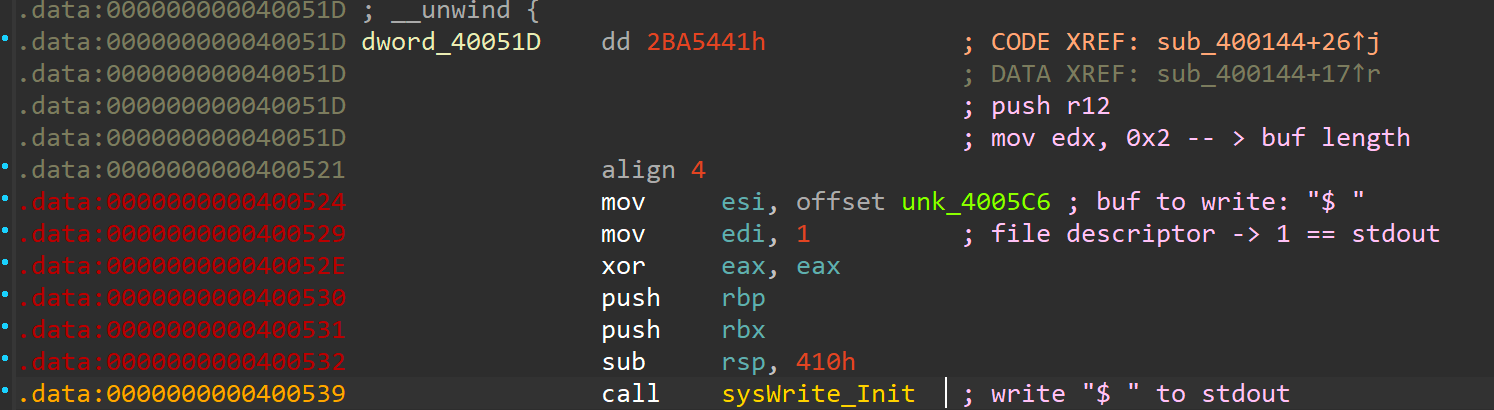
The remaining parameters of interest are the buffer with the contents to write in rsi ("$ "), the buffer length in rdx (0x2) and the file descriptor to write to in rdi (0x1 == stdout). So all this snippet does is presenting the user with a shell prompt character on stdout. Besides that, this snippet also contains saving register values on the stack (2 x push) and preparing the stack for what is about to come next sub rsp, 0x410).
Now that we have talked about the second snippet (blue box) the third one (green box) will be dealt with fast, as its pretty much the same functionality with one different function call.

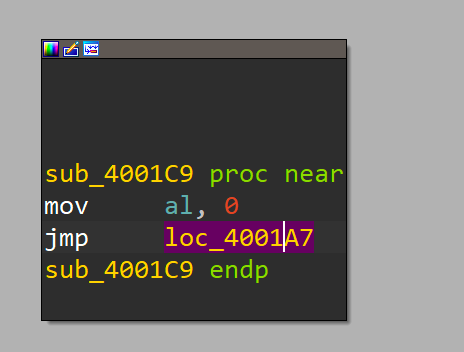
When following along until here, you should recognize what is going on. In sub_4001c9 we're setting the al portion in rax to 0 instead of setting it to 1 as before. The direct jump that follows is to the same location as before, meaning another syscall is being executed here! Syscall number 0x0 corresponds to sys_read. So, when putting it all together, we can annotate the disassembly in IDA as follows:

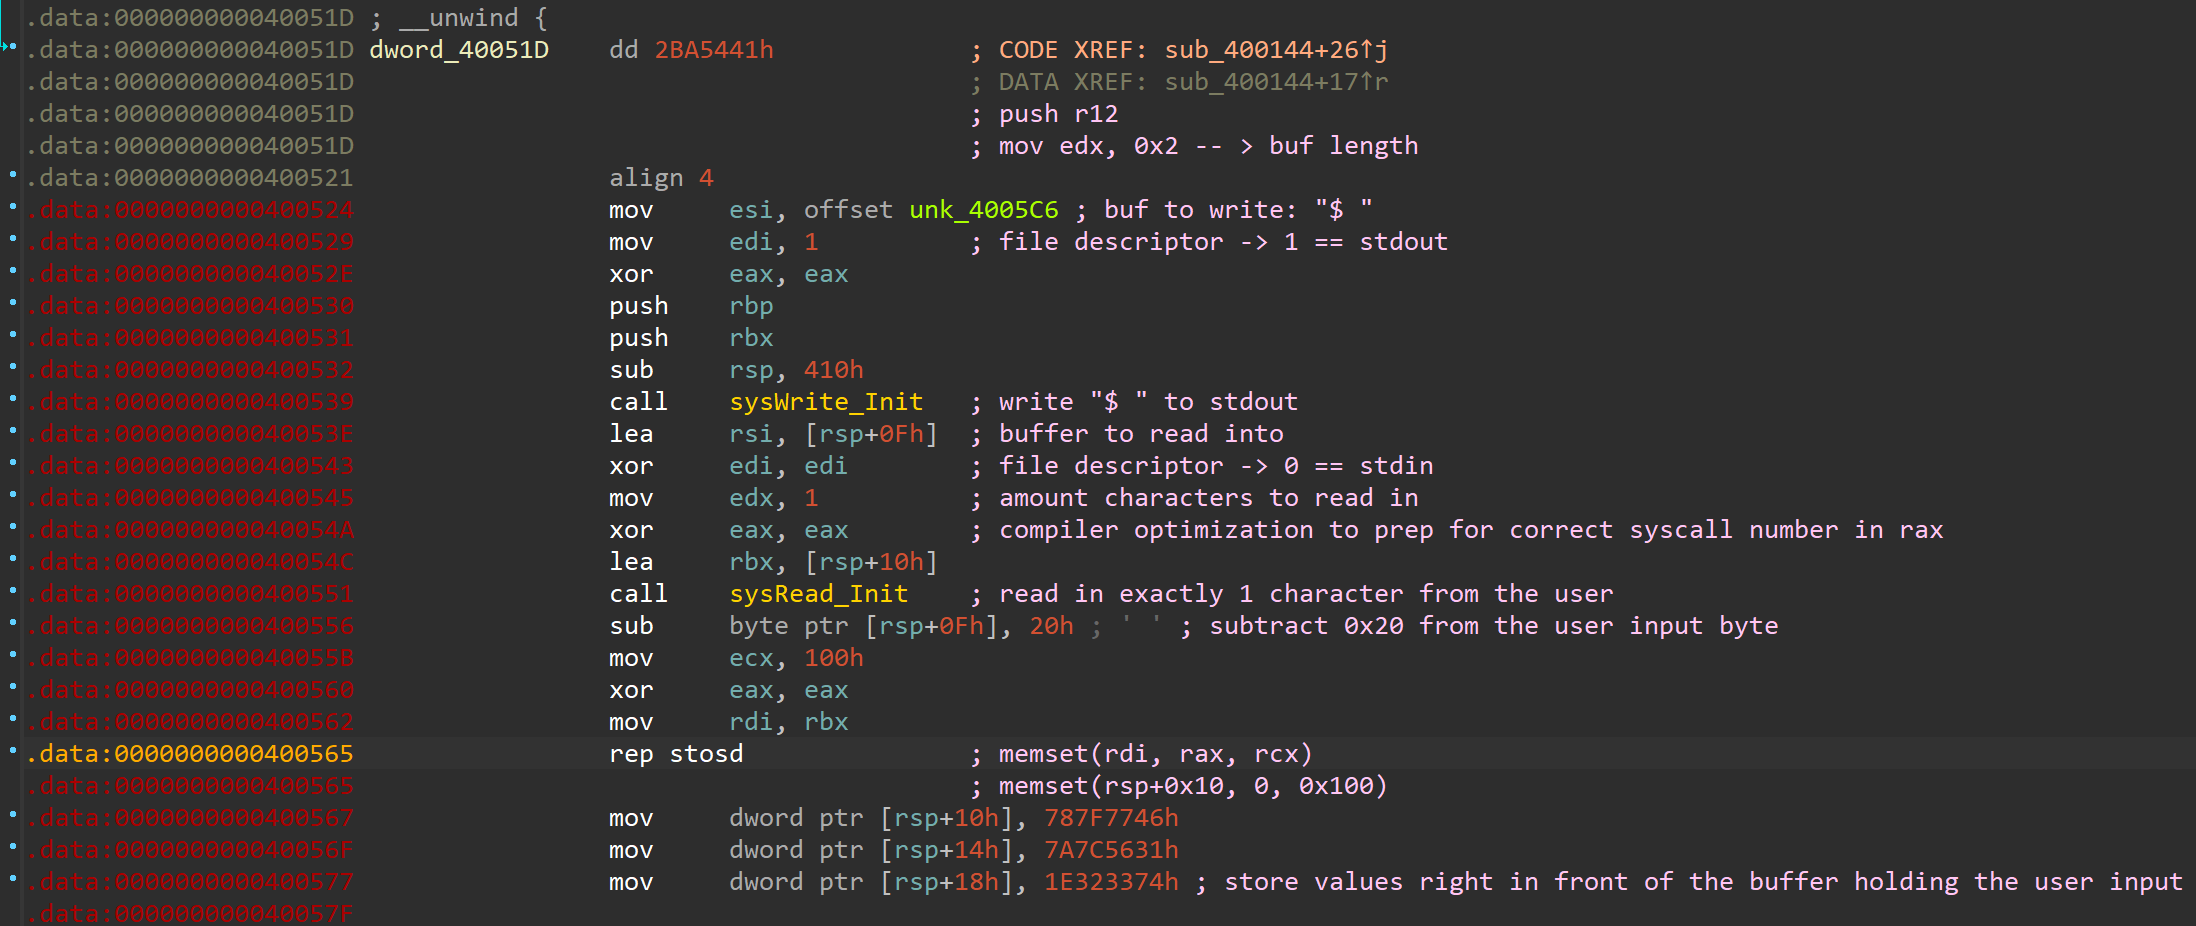
We've seen this exact behavior we just annotated in the disassembly when running the binary after using the dd trick on it! The next part (pink) finishes the setup phase that is being done :

This one effectively does 3 things in total:
rsp+0x0fholds the 1 byte buffer for the user input. Whatever character the user entered 0x20 is subtracted from its ASCII value (e.g. "A" == 0x41 - 0x20 = 0x21 == "!").- The next part up to (and including the
rep stosd) is equal to avoid *memset(void *b, int c, size_t len)operation with len (rcx), c (rax), and *b (rdi). This initializes a 256 byte buffer to 0. Alternatively, this pattern ofrep stosXcan also be encountered onvoid *memcpy(void *dest, const void *src, size_t n);operations. - Finally, 3 4-byte values are put one after another into that zero-initialized buffer, which if you look closely is right in front of the single user byte input buffer! Moreover, when looking at those values, we can uncover that most of those hex values are either in ASCII range (0x20 - 0x7e) or are located very close to that. This gives us access to the assumption that this is the secret message we're looking for. Decoding this as it doesn't yield anything useful, though:

This is the end of the data preparation in this part of the binary. We encountered the exact code we have been seeing when executing the binary in our very brief dynamic analysis part earlier! These are namely the "shell prompt" and the possibility for a 1 byte user input. Next we'll take a look at the actual deciphering scheme to find the secret message!
Part 2 of newly discovered code - Deciphering
Similar to Part 1 this stage consists of 3 large blocks that we'll discuss here. Below you can find the bare un-annotated IDA disassembly:
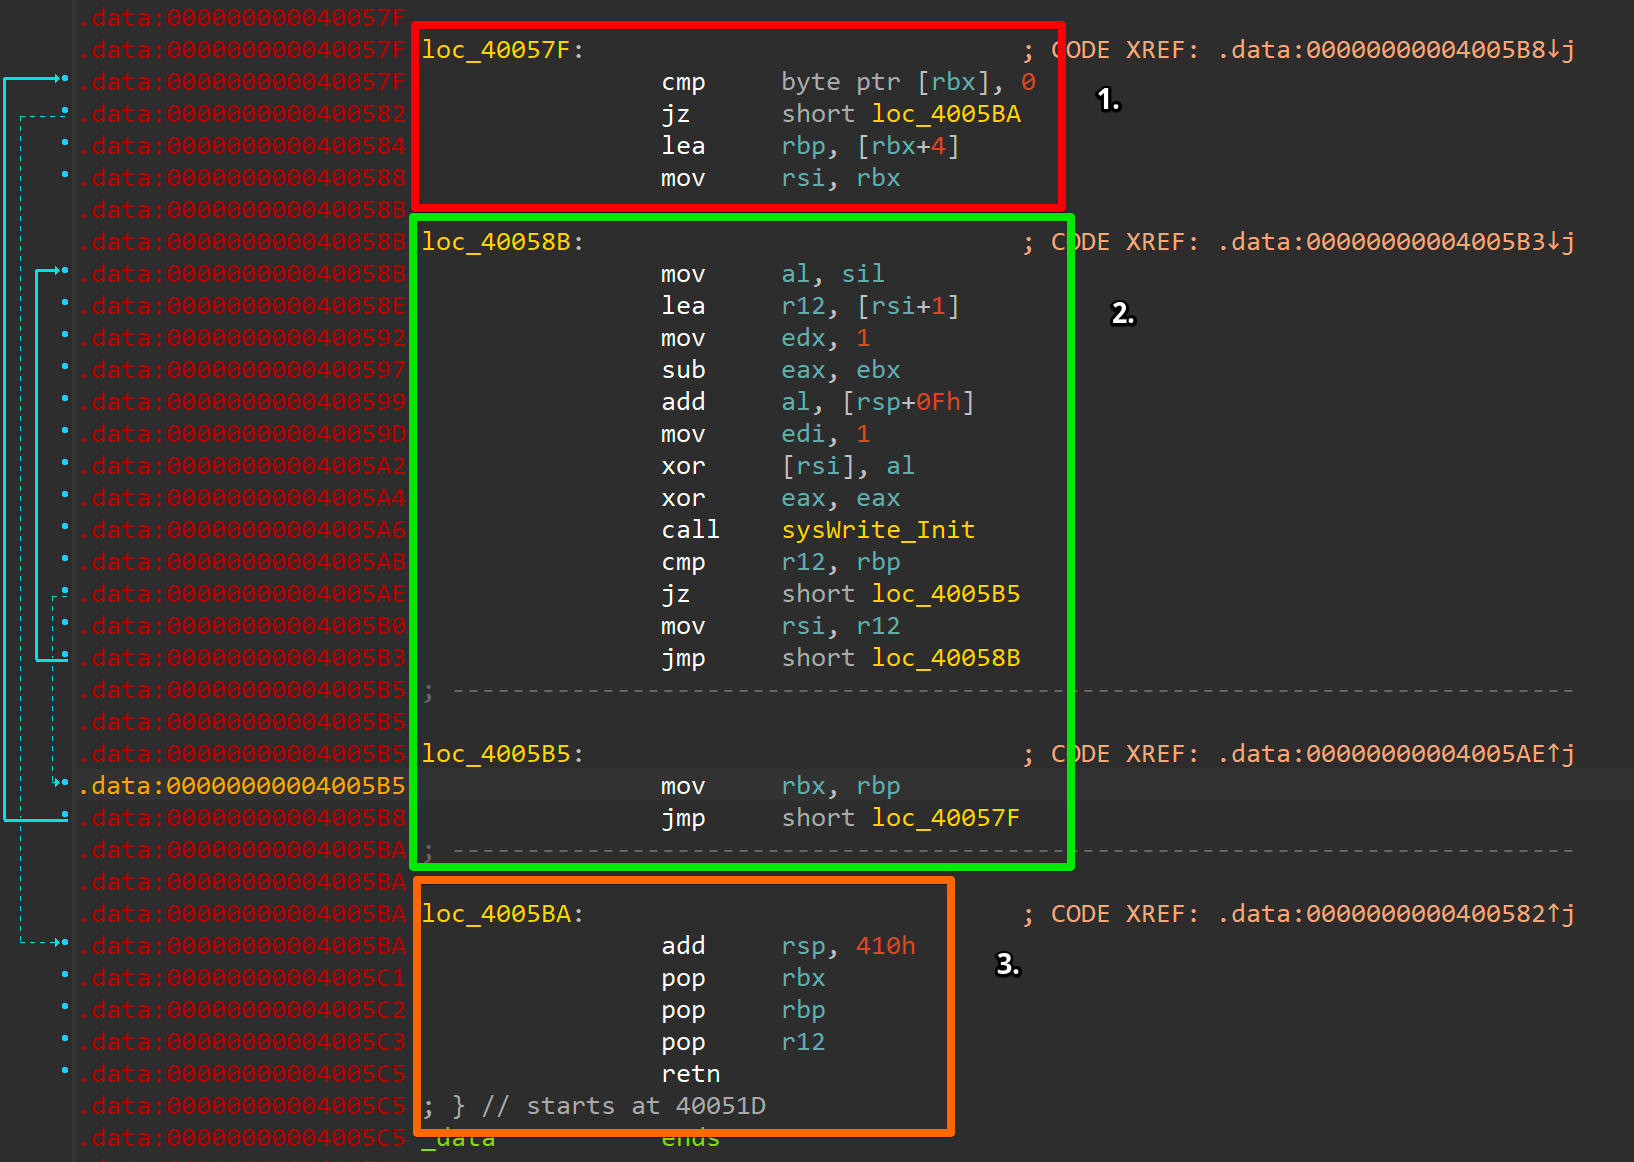
When first reaching, the code at address 0x40057f rbx still points to rsp+0x10, which corresponds to the beginning of the 12 byte cipher. Hence, as we're on 64-Bit, the contents of rbx at this very point: [rbx] == 0x7a7c5631787f7746. This results in the jz failing at first, but with the fact that 0x40057f is also the jump target from 0x4005b5 we have a clear loop exit condition showcasing that eventually we should reach a NULL pointer condition to not enter the loop body again. Right after, we access the cipher at index 4 and copy the value into rbp (during the first iteration this means rbp points to 0x1e3233747a7c5631), which corresponds to the latter 2 4-byte values in the very first iteration. Finally, another pointer to the cipher (rbx) is copied into rsi. To summarize that chaos: We have a loop exit condition and if that one doesn't hold true we update two pointers with different indices into the cipher message.

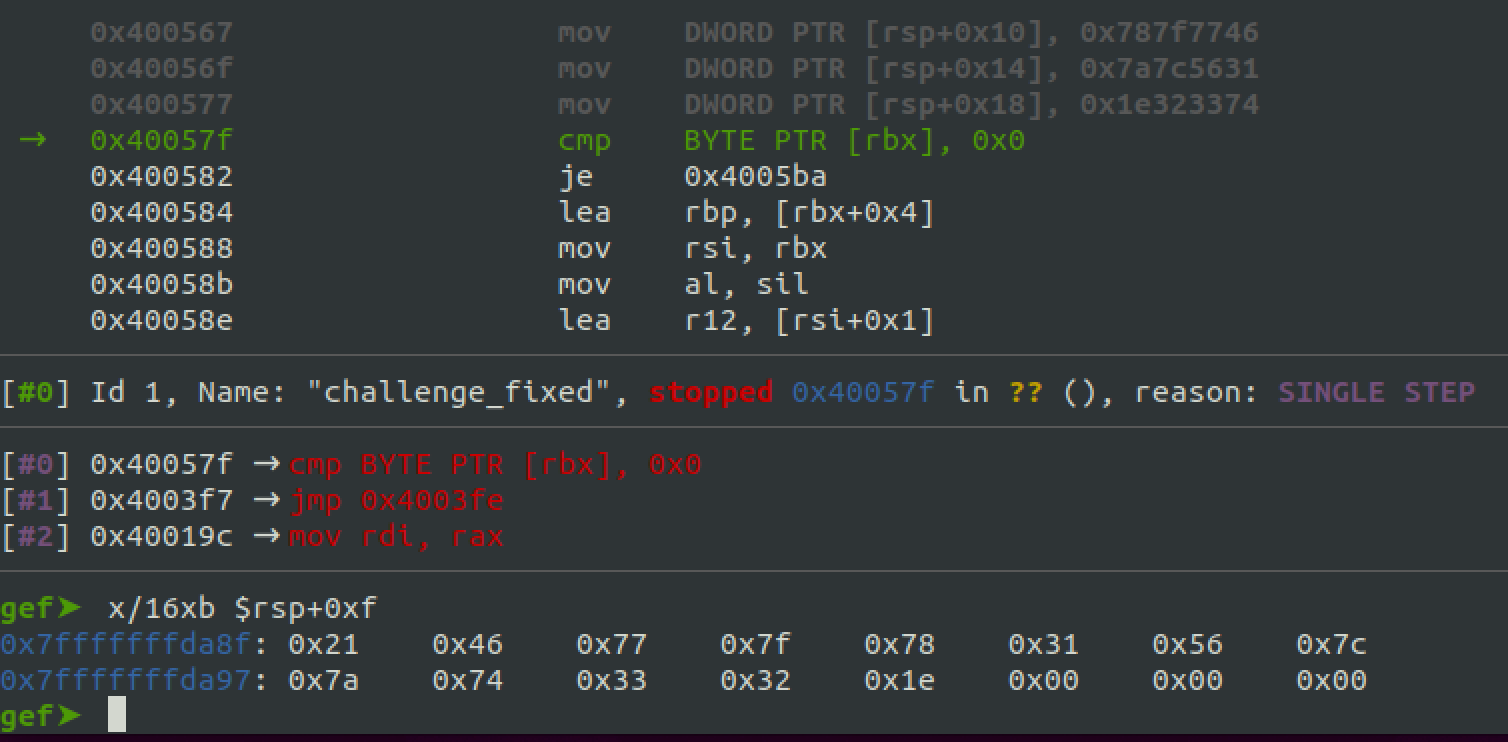
Above we can see a recap of the cipher message being stored in memory and the actual memory layout in GDB when debugging after the three mov instructions have been executed.
In the next block (green box) the "magic" of the binary happens. A strong very first indicator for that is the already labeled sysWrite_Init function call we already encountered and understood before. Meaning, we're definitely gonna print to stdout here! We have seen in our dynamic analysis that the only thing written back to stdout is the seemingly scrambled message! So let's try to figure out what kind of algorithm that is munching on the bits and bytes there :)! A quick first disassembly annotation of the code snippet may look like this:
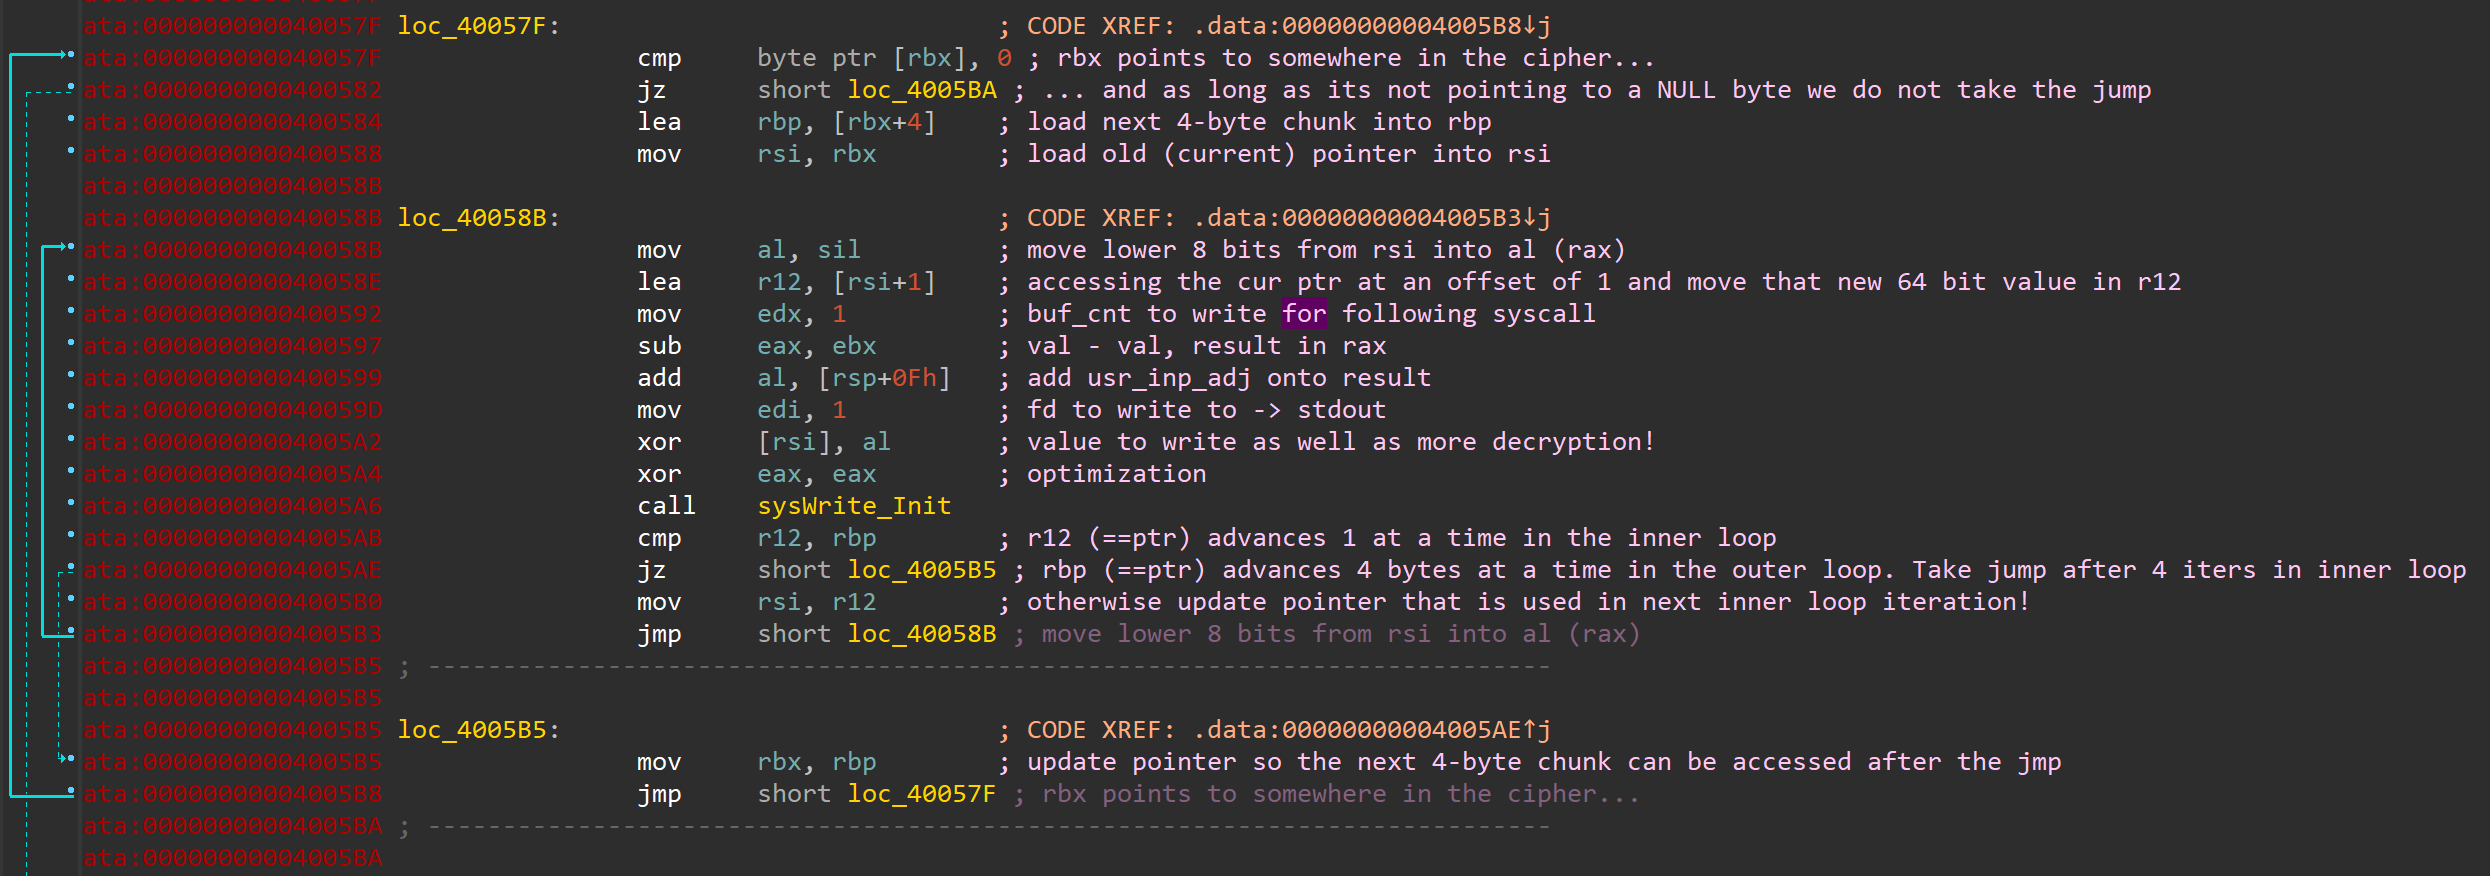
But that still looks rather gnarly and confusing, doesn't it? There are a few key takeaways in the block besides the obvious write to stdout. The decryption routine uses addition, subtraction and XOR. The inner loop handles the actual decrypting and printing, while the outer loop only occurs every 4 iterations (when r12 == rbp) to advance the pointer stored in rbp.
Reimplementing the decryption routine
Let's try re-implementing that above shown behavior! I used Python for a quick and dirty prototype. As the challenge is a statically linked binary and utilizes constant pointer values in its decryption, we need to consider this as well and implement a little memory map.
#!/usr/bin/env python3

import sys
from ctypes import *

# MMAP
mapping = {
    0: (0x00007FFFFFFFDAA0, 0x46),
    1: (0x00007FFFFFFFDAA1, 0x77),
    2: (0x00007FFFFFFFDAA2, 0x7F),
    3: (0x00007FFFFFFFDAA3, 0x78),
    4: (0x00007FFFFFFFDAA4, 0x31),
    5: (0x00007FFFFFFFDAA5, 0x56),
    6: (0x00007FFFFFFFDAA6, 0x7C),
    7: (0x00007FFFFFFFDAA7, 0x7A),
    8: (0x00007FFFFFFFDAA8, 0x74),
    9: (0x00007FFFFFFFDAA9, 0x33),
    10: (0x00007FFFFFFFDAAA, 0x32),
    11: (0x00007FFFFFFFDAAB, 0x1E),
    12: (0x00007FFFFFFFDAAC, 0x00),
    13: (0x00007FFFFFFFDAAD, 0x00),
    14: (0x00007FFFFFFFDAAE, 0x00),
    15: (0x00007FFFFFFFDAAF, 0x00),
    16: (0x00007FFFFFFFDAB0, 0x00),
    16: (0x00007FFFFFFFDAB1, 0x00),
    17: (0x00007FFFFFFFDAB2, 0x00),
    18: (0x00007FFFFFFFDAB3, 0x00),
    19: (0x00007FFFFFFFDAB4, 0x00),
    20: (0x00007FFFFFFFDAB5, 0x00),
}


def shifter(idx: int) -> int:
    tmp = 0
    for i in range(idx, 8 + idx):
        tmp |= mapping[i][1] << i * 8
    return tmp >> idx * 8


def decrypt(usr_in: str):
    mod_usr = ord(usr_in) - 0x20
    print(f"Modified user input: {hex(mod_usr)}")

    j = 0
    res = ""
    for i, v in mapping.items():
        al = v[0] & 0xFF
        if j % 4 == 0:
            idx = int(j / 4) * 4
            ebx = mapping.get(idx)[0]
        al_ebx = c_int32(al).value - c_int32(ebx).value
        al_ebx_w_usr = al_ebx + mod_usr
        val = shifter(i)
        xor = c_int64(val).value ^ (al_ebx_w_usr & 0xFF)
        # print(f"al_ebx: {hex(al_ebx)}, al_ebx_w_usr:
        #    {hex(al_ebx_w_usr)}, val: {hex(val)}, xor: {hex(xor)}")
        res += chr(xor & 0xFF)
        j += 1
        if j == 12:
            print(f"[+] Decrypted: {res}")
            sys.exit(0)


def main():
    if len(sys.argv) != 2:
        print(f"Usage: {sys.argv[0]} <usr_byte>!")
        exit()
    decrypt(sys.argv[1])


if __name__ == "__main__":
main()Now, running this script proves it's working as intended. The input-output-pairs below are identical with the values we were getting in the original binary (as seen in the beginning!):
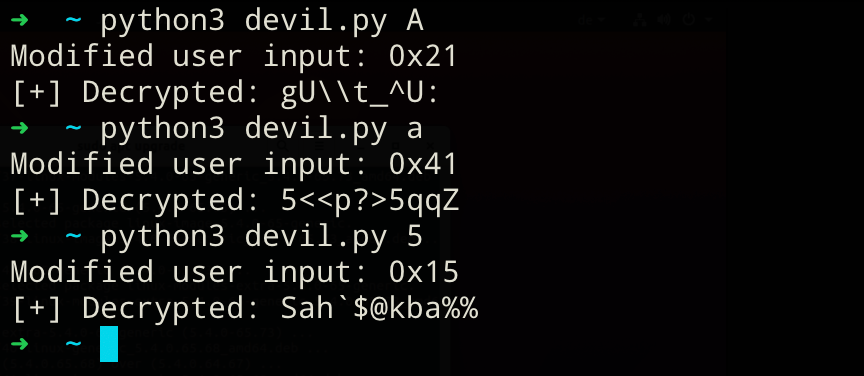
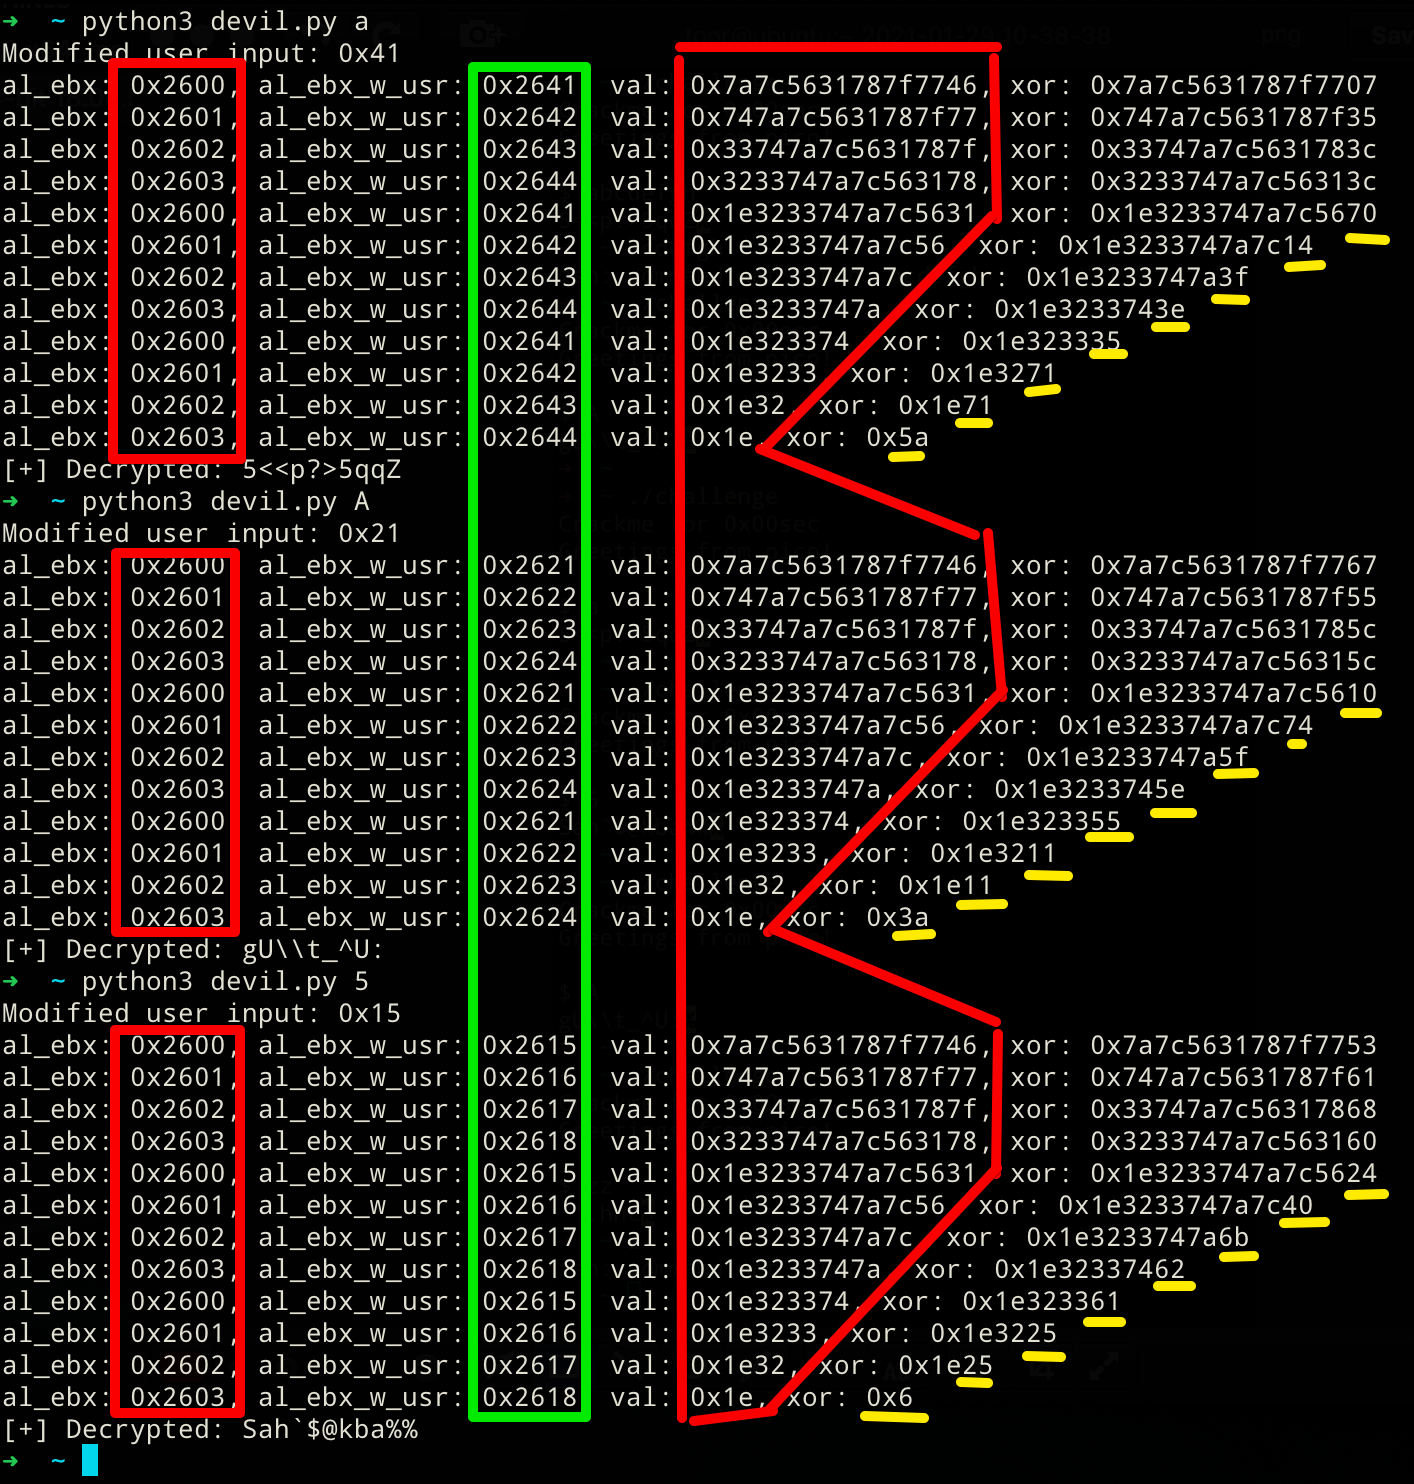
If the annotated disassembly or the python code are still confusing for you, take a look at this debug output below that visualizes the algorithm quite nicely! The value in al_ebx actually always hovers around 0x2600 to 0x2603. This value is independent of any user interaction and stays "constant" across all invocations! The second value marked with green changes across invocation, but that's only due to the modified user input (usr_in - 0x20) being added to al_ebx. As our input changed across the 3 runs, that value changed accordingly too. However, it follows the same pattern. The value repeats itself every 4 iterations! Second to last, the large, but shrinking hex value is the access into the hard-coded cipher. If you look closely, we can observe the 1-byte right shift to access the next cipher portion in the iterations. Finally, the least significant byte in the xor result is the byte that is getting printed to stdout.
At this point, one dumb brute force method that we could apply now is iterating over the whole possible input space and save those inputs where the output only contains lower- and upper-case ASCII characters, numerals, a space and maybe possible punctuations. This would weed out some garbage inputs, as we're expecting a "secret message". We could refine this approach even further, with the aim that the output closely represent the structure of a sentence/message. We can achieve that by specifying that our decrypted results has to start with letters, continue with whatever in the middle and have to end with some punctuation characters. On top of all of that, we could also check if the nth, nth+4, and the nth+8 entry in the decrypted cipher are always in that "valid" ASCII range we defined earlier. We're able to do this as one component that is being used within the xor repeats itself every 4 iterations (see in the screenshot above, e.g. iteration 0, 4, and 9!). Putting it all together leaves us with this:
Dumb brute force solution (completed)
#!/usr/bin/env python3

import string
import sys
from ctypes import *
from typing import List

ALPHABET = [x for x in (string.ascii_letters + string.digits + "!?_ ")]

# MMAP
mapping = {
    0: (0x00007FFFFFFFDAA0, 0x46),
    1: (0x00007FFFFFFFDAA1, 0x77),
    2: (0x00007FFFFFFFDAA2, 0x7F),
    3: (0x00007FFFFFFFDAA3, 0x78),
    4: (0x00007FFFFFFFDAA4, 0x31),
    5: (0x00007FFFFFFFDAA5, 0x56),
    6: (0x00007FFFFFFFDAA6, 0x7C),
    7: (0x00007FFFFFFFDAA7, 0x7A),
    8: (0x00007FFFFFFFDAA8, 0x74),
    9: (0x00007FFFFFFFDAA9, 0x33),
    10: (0x00007FFFFFFFDAAA, 0x32),
    11: (0x00007FFFFFFFDAAB, 0x1E),
    12: (0x00007FFFFFFFDAAC, 0x00),
    13: (0x00007FFFFFFFDAAD, 0x00),
    14: (0x00007FFFFFFFDAAE, 0x00),
    15: (0x00007FFFFFFFDAAF, 0x00),
    16: (0x00007FFFFFFFDAB0, 0x00),
    16: (0x00007FFFFFFFDAB1, 0x00),
    17: (0x00007FFFFFFFDAB2, 0x00),
    18: (0x00007FFFFFFFDAB3, 0x00),
    19: (0x00007FFFFFFFDAB4, 0x0),
    20: (0x00007FFFFFFFDAB5, 0x00),
}


def shifter(idx: int) -> int:
    tmp = 0
    for i in range(idx, 8 + idx):
        tmp |= mapping[i][1] << i * 8
    return tmp >> idx * 8


def calc(idx: int, al_ebx_w_usr: int, res: List[chr], j: int) -> (List[chr], int):
    val = shifter(idx)
    xor = chr((c_int64(val).value ^ (al_ebx_w_usr & 0xFF)) & 0xFF)
    res.append((idx, xor))
    if xor in ALPHABET:
        j += 1
    return res, j


def decrypt():
    j = 0
    pos_sol = []
    for k in ALPHABET:
        # print(f"Trying {k} as input")
        for i in range(4):
            al = mapping.get(i)[0] & 0xFF
            ebx = mapping.get(0)[0]
            al_ebx = c_int32(al).value - c_int32(ebx).value
            al_ebx_w_usr = al_ebx + ord(k) - 0x20
            for l in [0, 4, 8]:
                pos_sol, j = calc(i + l, al_ebx_w_usr, pos_sol, j)
        if j == 11:
            dec = "".join(x[1] for x in sorted(pos_sol, key=lambda k: k[0]))
            print(f"Possible solution candidate: {k}\n  --> Yields decrypted cipher: {dec}")
            sys.exit()
        j = 0
        pos_sol.clear()


def main():
    decrypt()


if __name__ == "__main__":
    main()
This script will stop running at the first occurrence where all above made assumptions are met. If our scope for a valid decryption was perfectly executed, our script should always return the same correct solution.
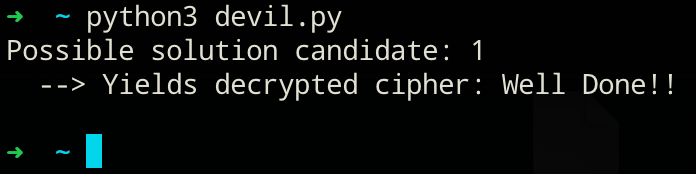
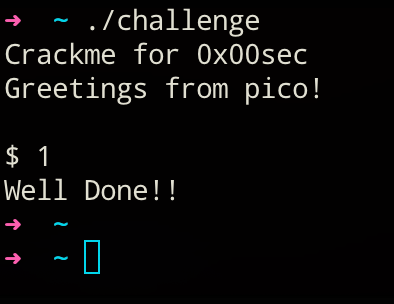
Nice! We seem to have solved this challenge now, as the decrypted cipher text looks pretty darn good. Finally, let's confirm this solution in the original challenge:
Conclusion
This small challenge was really fun diving into. For people wanting to try out all of this, I have a few closing words. Just do it! I learned a tad more about the ELF executable format, dd, and static analysis in general :). Knowledge that I can use and apply for my next binary I would like to investigate or reverse engineer! So just bring some time and don't give up easily :). Doing this is like puzzling for grown-ups, with a much higher frustration but also rewarding factor!
If you have read until here, thank you very much, and I really hope you enjoyed that little write-up in addition to maybe having learned a thing or two.